Introduction
About Siso Smart Fields
Siso Smart Fields is a bespoke no-code tool designed to bring advanced database customization to Odoo Community Edition, while functioning as a robust, parallel enhancement for Enterprise users. It lets administrators create custom database columns on any Odoo model directly from a simple Settings interface—with no Python code and no server restarts required.
A Parallel Tool for Every Edition
While the primary goal of Siso Smart Fields is to provide Community users with a capability typically reserved for Enterprise Studio, it is built with an architecture that respects and enhances both environments:
- Bespoke for Community: Offers a streamlined, focused interface for adding custom fields to your Odoo implementation without an Enterprise subscription.
- Parallel to Studio: For Enterprise users, Smart Fields can function as a convenient, lateral tool. It can coexist perfectly with Odoo Studio, allowing you to choose the best tool for each specific use case.
- Clean Architecture: To ensure zero conflict, Smart Fields uses the
x_siso_ prefix for all technical names, keeping them distinct from Studio's x_studio_ fields while remaining equally usable across the system.
Native Database Performance
Fields created with Siso Smart Fields are real database columns. They are immediately available to Odoo's built-in filter and group-by tools, to server actions and automations, to reports, and to any custom scripts or integrations that query the database. There is no intermediate layer—the data is stored natively in the same PostgreSQL tables used by Odoo's own fields.
Beyond storage, Smart Fields can optionally inject the field directly onto the model's default form view. The placement is configurable: choose the notebook tab, the named section within that tab, and—where the section has a two-column layout—the left or right column.
Part 1
User Guide
What users can do with custom fields once they have been created and placed on a form.
Chapter 1
Using Custom Fields
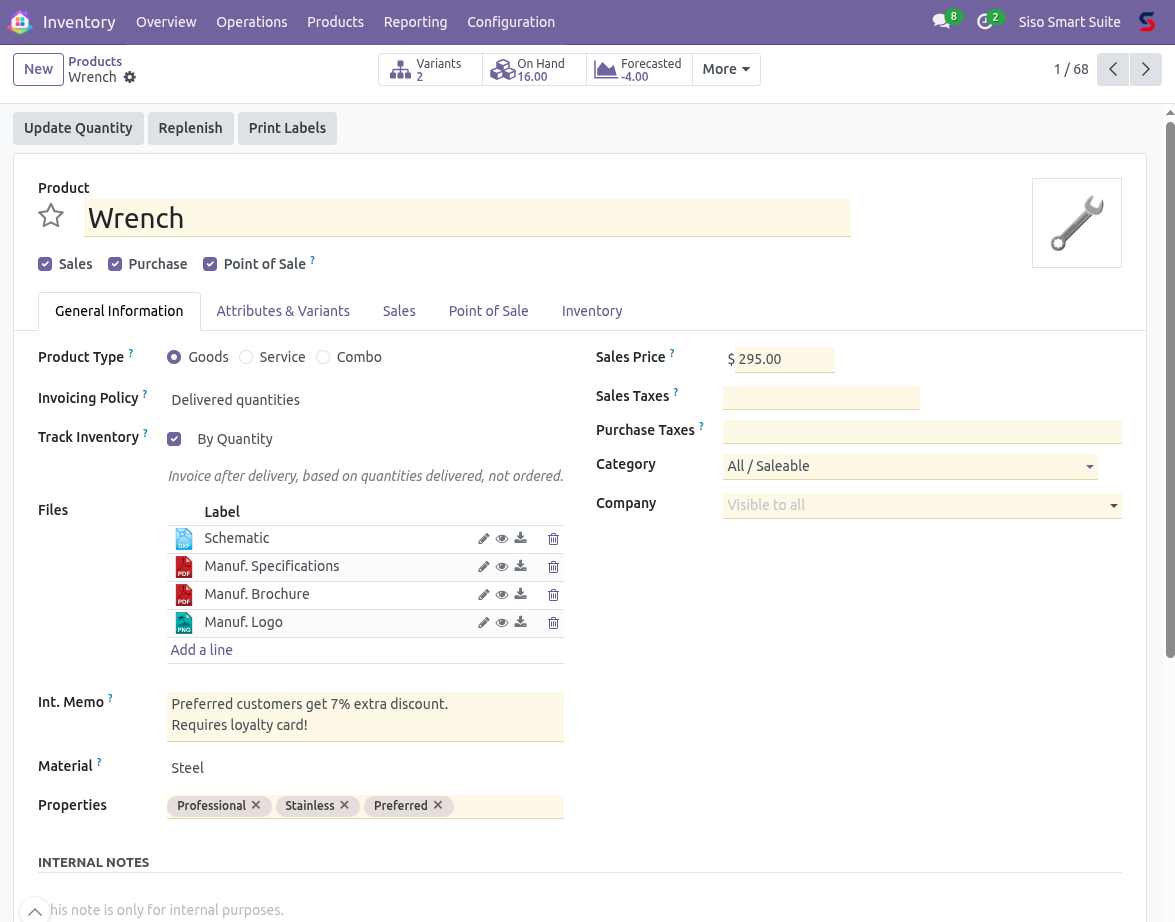
Custom fields created with Smart Fields appear on form views just like any native Odoo field. There is no visual distinction that marks a field as custom — it has a label, an input control, and optionally a ? tooltip icon if the administrator has added a help text.
Custom fields are fully integrated with Odoo's standard interface:
- Filters and Group By: Every custom field appears automatically in the Filters and Group By menus of the corresponding model's list and kanban views.
- Export: Custom fields are available in Odoo's built-in export dialog alongside native fields.
- Automations and Server Actions: Custom fields can be referenced in scheduled actions, record rules, and server action code.
- Reports: Fields can be included in QWeb report templates by referencing their technical name (prefixed with
x_siso_).
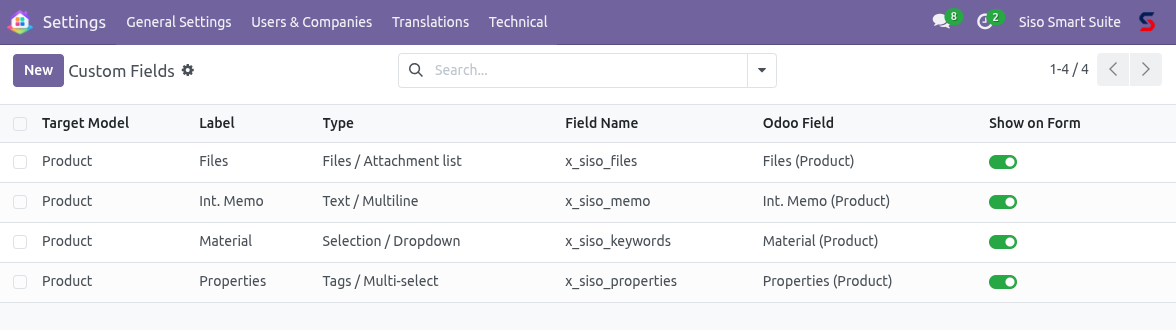
Finding the Technical Name
Every custom field's full database column name is shown in the field definition form as Full Field Name. The format is always x_siso_<name>, for example x_siso_visma_id.
Chapter 2
Field Types Reference
Smart Fields supports ten field types. Each type stores data natively in the Odoo database and renders with the appropriate widget on form views.
| Type | Storage | Widget | Best for |
|---|
| Text / VARCHAR | varchar(n) | Single-line input | Short identifiers, codes, names |
| Text / Multiline | text | Textarea | Notes, descriptions, instructions |
| Integer | int4 | Number input | Counts, quantities, IDs |
| Float / Decimal | float8 | Number input | Measurements, scores, prices |
| Boolean | bool | Toggle | Yes/No flags, switches |
| Date | date | Date picker | Deadlines, dates of birth, expiry |
| Date & Time | timestamp | Datetime picker | Events, timestamps |
| Selection / Dropdown | varchar | Select menu | Status, classification, category |
| Tags / Multi-select | many2many | Tag chips | Keywords, attributes, labels |
| Files / Attachment list | many2many | File list | Documents, drawings, PDFs |
Field Type is Locked After Creation
Once a field has been created and the database column provisioned, the Field Type, Field Name, and Target Model cannot be changed. To change the type, delete the field and create a new one. Deletion is a permanent operation — see Chapter 9.
Chapter 3
Dropdown and Tags Fields
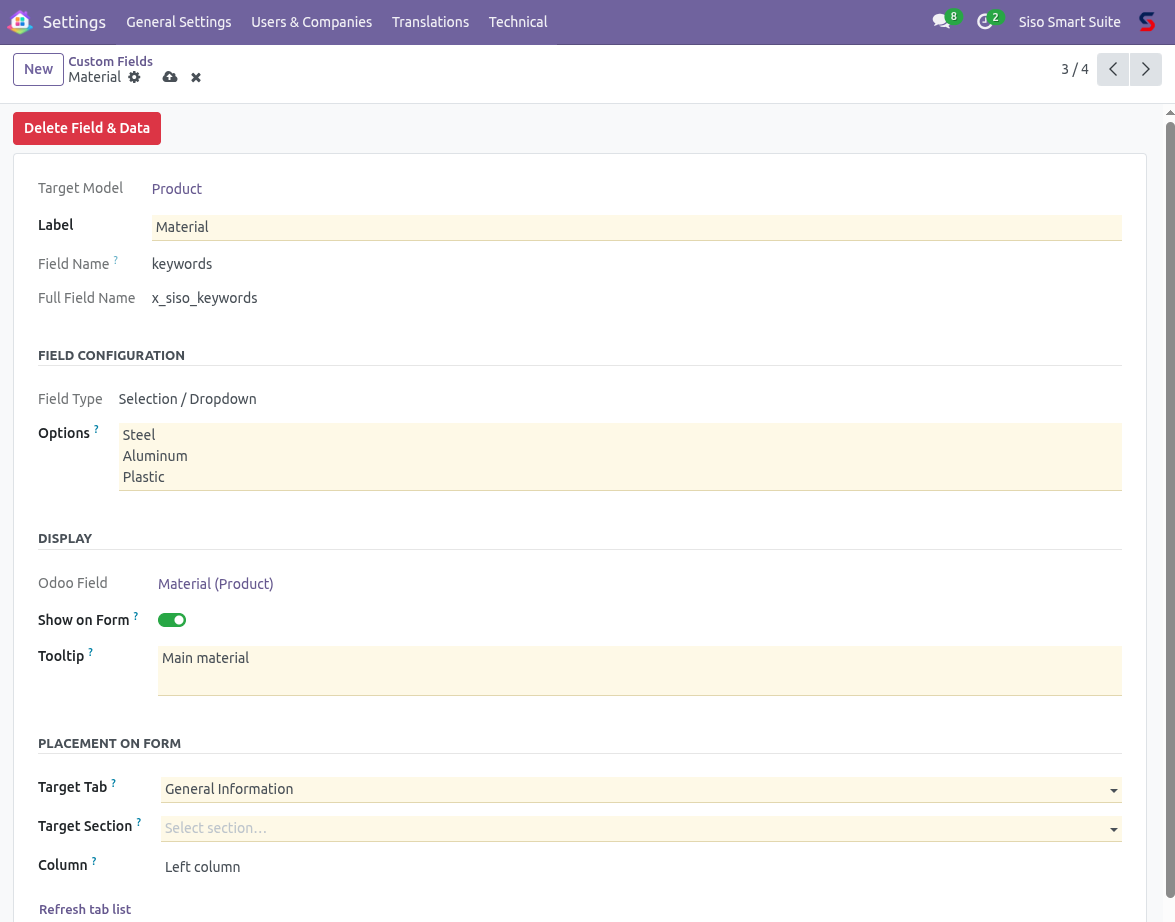
Both the Selection / Dropdown and Tags / Multi-select types require a list of options. Options are defined in the Options text area in the field definition.
Entering Options
Enter one option per line. The simplest form is a plain label — Smart Fields will use it as both the stored value and the display label:
Metric
Imperial
Other
If you need separate stored values and display labels (useful for integrations that rely on specific codes), use value,Label format:
metric,Metric System
imperial,Imperial System
other,Not specified
You can also paste a JSON array directly:
[["metric", "Metric System"], ["imperial", "Imperial System"]]
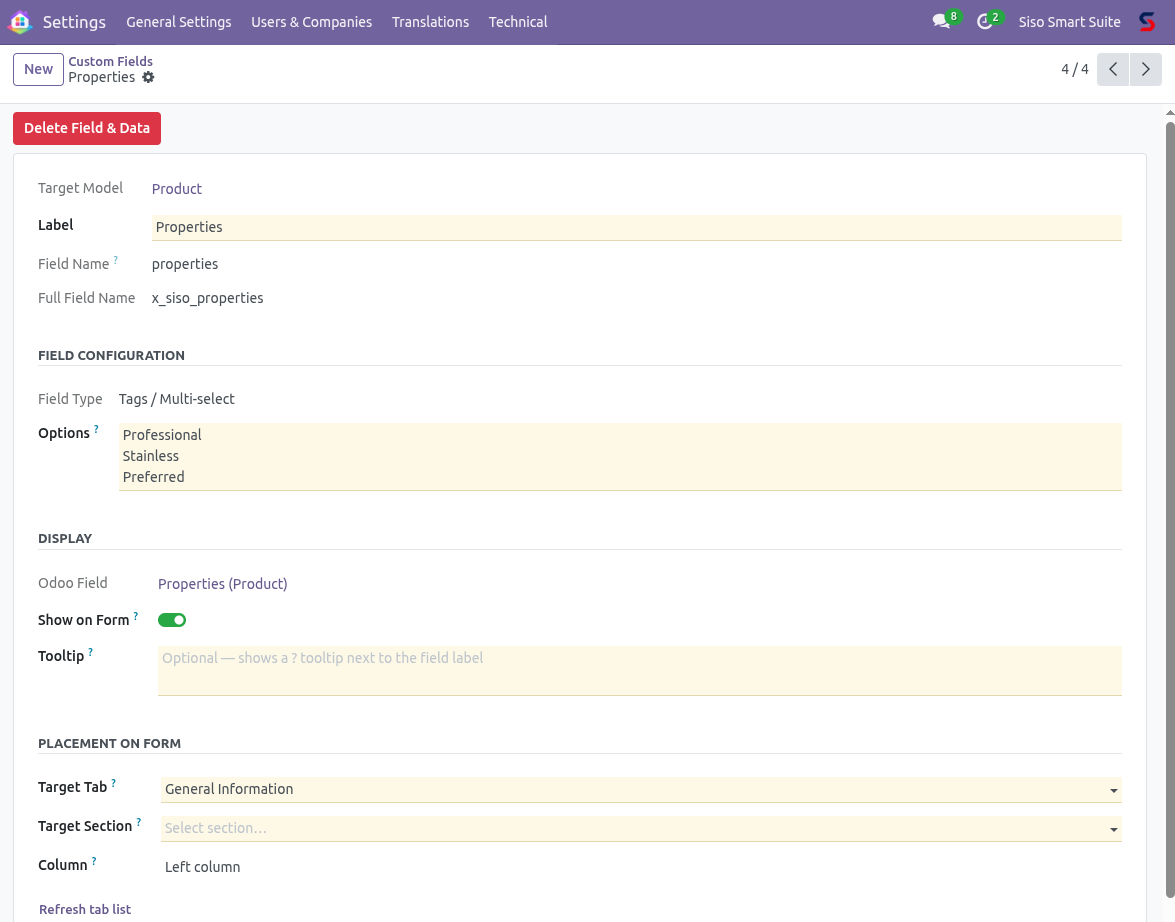
Tags / Multi-select
The Tags type creates a native many2many field. Options are pre-populated from the Options text but can also be created directly on any record by typing a new value into the tag input — no need to return to the field definition.
Updating Options
Edit the Options text in the field definition and save. For dropdowns, the new options list is pushed to the database column immediately. For tags, new entries are added to the options pool — existing selections on records are not affected.
Chapter 4
File Attachments
The Files / Attachment list type adds a file management section directly to any form. Files are stored in Odoo's private attachment model, separate from the chatter attachments on the same record.
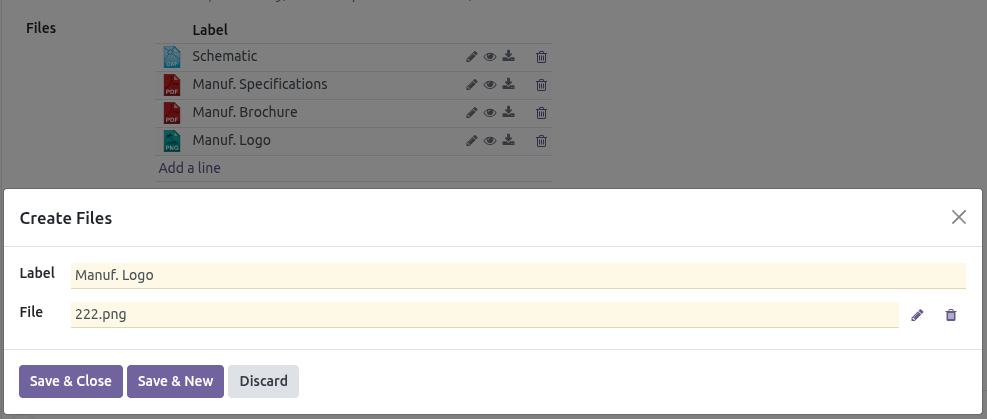
Each row in the list displays:
- A file-type icon automatically selected from a library of 400+ recognised formats (PDF, XLSX, XML, DWG, PNG, MP4, and many more).
- A Label — a free-text title set by the user when uploading.
- A preview button — opens the file in a new browser tab; the browser decides whether to display or download based on the MIME type.
- A download button — forces a download regardless of MIME type.
- A delete button — removes the file.
Adding a File
1
Click Add a line below the file list.
2
In the dialog that opens, enter a Label (e.g. "Q1 2026 SAF-T Export") and click the File field to select the file from your computer.
3
Click Save. The file appears in the list with its type icon.
Editing a File
Click any row in the file list to open the dialog again. You can change the label or replace the file without deleting and re-uploading.
Configuring the Row Limit
By default, the list shows up to 4 rows before displaying a Load more link. Administrators can change this limit per field using the Max visible rows setting in the field definition — see Chapter 6.
Part 2
Administration
Creating, configuring, placing, and removing custom fields.
Chapter 5
Installing Siso Smart Fields
Siso Smart Fields requires Siso Smart Hub to be installed first. Smart Hub provides the Siso Smart Suite section in the Settings menu where Smart Fields appears.
2
Update Apps List: Navigate to Apps, enable Debug Mode, and click Update Apps List.
3
Search and activate: Search for siso smart fields and click Activate.
After activation, Custom Fields appears under Settings → Technical → Siso Smart Suite.
Odoo.sh Deployment
On Odoo.sh, push the siso_smart_fields module directory to your custom addons branch. Both siso_smart_hub and siso_smart_fields must be present. Odoo.sh will install them automatically if they appear in the Apps list.
Chapter 6
Creating Custom Fields
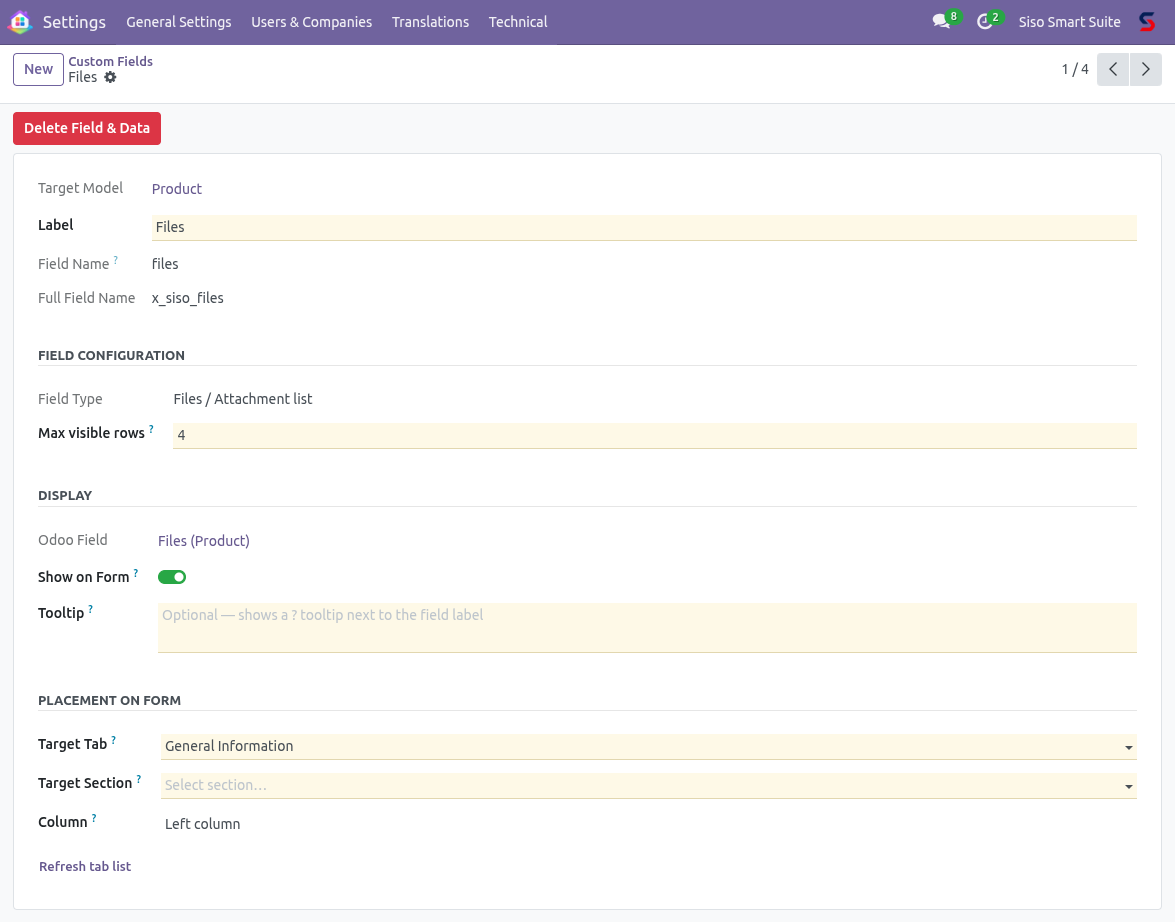
Navigate to Settings → Technical → Siso Smart Suite → Custom Fields and click New.
Required Fields
- Target Model
- The Odoo model to add the field to. Start typing the model's display name (e.g. Product, Contact, Sale Order) to search. The field will be added to the underlying database table for this model.
- Label
- The display name shown to users on form views and in filter/group-by menus. Can be changed after creation.
- Field Name
- The internal database identifier. Must start with a lowercase letter and contain only lowercase letters, digits, and underscores. Stored as
x_siso_<field_name>. Cannot be changed after creation.
- Field Type
- The data type. Cannot be changed after creation. See Appendix A for a quick reference.
Type-Specific Parameters
Additional fields appear depending on the selected type:
- Max Length (Text / VARCHAR): Maximum number of characters. Defaults to 255.
- Precision (Float): Format as
total_digits,decimal_places, e.g. 16,2.
- Options (Selection, Tags): One option per line. See Appendix B.
- Max visible rows (Files): Row limit before "Load more" appears. Defaults to 4.
Save to Provision
Saving the field definition immediately creates the database column. The field is available to filters, automations, and scripts the moment the record is saved — no restart needed.
Tooltip
An optional Tooltip text field appears in the Display section when Show on Form is enabled. Enter any text here and a ? icon will appear next to the field label on the form, showing the tooltip text on hover — identical to how Odoo documents its own built-in fields.
Chapter 8
Managing and Updating Fields
Open any field definition from Settings → Custom Fields to make changes. The following properties can be updated after creation:
- Label — the display name. Updating this renames the field in all form views and filter menus immediately.
- Max Length — for Text / VARCHAR fields (take effect on next write to the field).
- Precision — for Float fields.
- Options — for Selection and Tags fields. New options are added; existing records are not affected.
- Max visible rows — for Files fields.
- Show on Form — toggle to add or remove the field from the form view.
- Placement settings — tab, section, column, and tooltip.
Locked Properties
The following properties are locked after the field is first saved: Target Model, Field Name, and Field Type. These define the physical database column structure and cannot be changed without deleting and recreating the field.
Chapter 9
Deleting Fields Safely
Open the field definition and click the red Delete Field & Data button at the top of the form. A confirmation dialog appears before any data is removed.
1
The form injection view for this field is removed. If other fields share the same model's injected view, those placements are preserved.
2
The ir.model.fields database record and the underlying column are dropped from the model's table.
3
For Tags fields, the associated private options model is also removed. For Files fields, the inverse relationship field is cleaned up.
4
The Smart Fields definition record itself is deleted.
This Operation is Permanent
Deleting a field removes all stored data for that field across every record in the system. This cannot be undone. Always back up your database before deleting fields that contain important data.
References in Other Objects
If the field is referenced in saved filters, server actions, or automation rules, those references will break after deletion. Odoo does not automatically clean up references to deleted fields in these objects — review and remove them manually beforehand.
Chapter 10
Adopting Orphaned Fields
An orphaned field is an x_siso_-prefixed column that exists in the database but has no corresponding Smart Fields definition record. This can occur after a database migration, a manual SQL operation, or if the definition record was deleted directly from the database.
To bring orphaned fields back under management, open the Custom Fields list view and click the Adopt Orphaned Fields action button in the action menu. Smart Fields will scan for all x_siso_ columns without a definition and create one for each, restoring management control.
After Adoption
Adopted fields are created with minimal metadata — label derived from the field name, type inferred from the column type. Review each adopted field and update the label, add placement settings, and configure any type-specific options that apply.
Appendix A
Field Type Quick Reference
Summary of all available field types and their key properties.
| Type | DB Column | Configurable Parameters | Locked after save? |
|---|
| Text / VARCHAR | varchar(n) | Max Length (default 255) | Type, Field Name, Model |
| Text / Multiline | text | — | Type, Field Name, Model |
| Integer | int4 | — | Type, Field Name, Model |
| Float / Decimal | float8 | Precision (e.g. 16,2) | Type, Field Name, Model |
| Boolean | bool | — | Type, Field Name, Model |
| Date | date | — | Type, Field Name, Model |
| Date & Time | timestamp | — | Type, Field Name, Model |
| Selection / Dropdown | varchar | Options list | Type, Field Name, Model |
| Tags / Multi-select | many2many table | Options list (pre-populated) | Type, Field Name, Model |
| Files / Attachment list | many2many table | Max visible rows (default 4) | Type, Field Name, Model |
Appendix B
Options Text Syntax
How to format the Options field for Selection and Tags field types.
Supported Formats
The Options text area accepts three formats, which can be mixed within the same field:
Plain Labels (simplest)
One label per line. The label is used as both the stored value and the display value.
Metric
Steel
Insulated grip
Premium
Key,Label Pairs
One pair per line in value,Display Label format. The value is what gets stored in the database; the label is what the user sees. Use this when integrations depend on specific stored codes.
metric,Metric System
imperial,Imperial System
not_specified,Not specified
JSON Array
Paste a JSON array of [value, label] pairs directly. Useful when copying option lists from another system.
[["metric", "Metric System"], ["imperial", "Imperial System"], ["other", "Other"]]
Blank Lines Are Ignored
Empty lines in the Options text are silently skipped. Lines without a comma are treated as plain labels (value = label).
Updating Options
Edit the Options text and save the field definition. For Selection fields, the full options list is replaced. For Tags fields, new entries are added to the tag pool — entries removed from the Options text remain in the database (and on existing records) but will no longer appear as suggestions in the tag input.
Changing Selection Values
If you rename a stored value in a Selection field's options (e.g. change metric to metric_si), any records that already have metric stored will display a blank or invalid value. Always migrate data before renaming stored values.